
(Please write a review and rate Gun Log +P on the App Store.)
(If you have having issues contact me through the support email. iTunes App Store does not give me any customer information and I can not use the ranking area as a blog.)
(Note: These are directions for Gun Log +P version 5.3 which has not yet been release by Apple. Hopefully this will be available before August!)
When you first launch Gun Log +P (GL+P) the first screen of information is the Weapons view.
If you look at the bottom of the screen you will see the "Tab Bar". The item selected is "Weapons".

To create a new weapon entry just tap the "+" button at the top right. The buttons at the top are in a button bar. Typically most interaction with a view will be at the top in a button bar.
When you tap the "+" button GL+P goes directly to a new weapon's detail view.

In the Weapon Details view you can enter data and navigate to lists for configurations and maintenance, a photo, ballistic drop table, or a report. Notice each button in the button bar that is used to access stated functionality.
First thing to do is enter a make. Tap the "Make" button. A "Make Picker" will appear. If your weapon make is not listed you can cancel the picker and tap directly into the "Make" field to the right of the button and enter the make or you can enter a "Custom" value by clicking the "compose" button at the top right.

Just type in the custom value and top the blue "+" button on the right.


Tap the done button at the bottom right to go back to the picker list.

In this example I want to use an existing maker so tap the "All" button to show all of the makers.

Double tap the maker or tap the "done" button.

Select the make from the picker and tap "Done" or double tap the entry. Next enter the model if you want to record model information. Model data has to be entered via the keyboard, there is no picker for models.

There is a picker for calibers and it has most calibers listed. The entries are grouped, so flip the picker and scroll around to see the layout. You may enter a custom value as well by tapping the compose button at the top right.

As with most pickers, double tap the entry you want or single tap to select the entry and then tap the "Done" button.

Tapping the "Action/Type" button brings up a picker. It works just like the other pickers.

You can give a weapon a nick name. It is not unusual for firearm owners to have more than one firearm of the same model.

You can dismiss the keyboard by tapping the button on the lower right of the keyboard. Now tap the "Configurations" button at the top left of the button bar.

A weapon may have several configurations. For pistols it is not unusual to see a .357 SIG and .40 S&W barrel for the same weapon. For rifles you may have different optic configurations or you may take note of optic settings for different zero ranges. Weapon Configurations is a very handy feature.
Notice that there is a default configuration saved for you. You can use that entry, delete that entry, or add another configuration entry. To initiate a delete action for an entry tap the "Edit" button at the left of the button bar or swipe right to left across the entry.
To add a new Weapon Configuration just tap the "+" button at the top right of the button bar.

To navigate to the new entry entitled "Blank Name" just tap the row entry or the blue arrow button.

You should give the entry a description. Just tap in the "Description" field.

If you want to use the Ballistics Drop estimator, an external ballistics calculator, you need to enter the values for "Sight Height" and "Zero Distance".

Tap the "Configurations" button at the left of the top button bar to go back to the list of configurations.

Continue to go back by tapping the "Weapon" button.

For each weapon you can track maintenance. Obviously maintenance is essential for firearms and a note with details about maintenance can be useful. Just tap the "Maintenance" button in the top button bar to navigate to the "Maintenance History" list.

There is an entry already created for you called "New Weapon...". You can use that entry, delete it, or make another. To initiate a delete action for an entry tap the "Edit" button at the left of the button bar or swipe right to left across the entry.
Tap the "+" button to add a new entry.

To navigate to the "Maintenance" details just tap the entry or the blue arrow button.

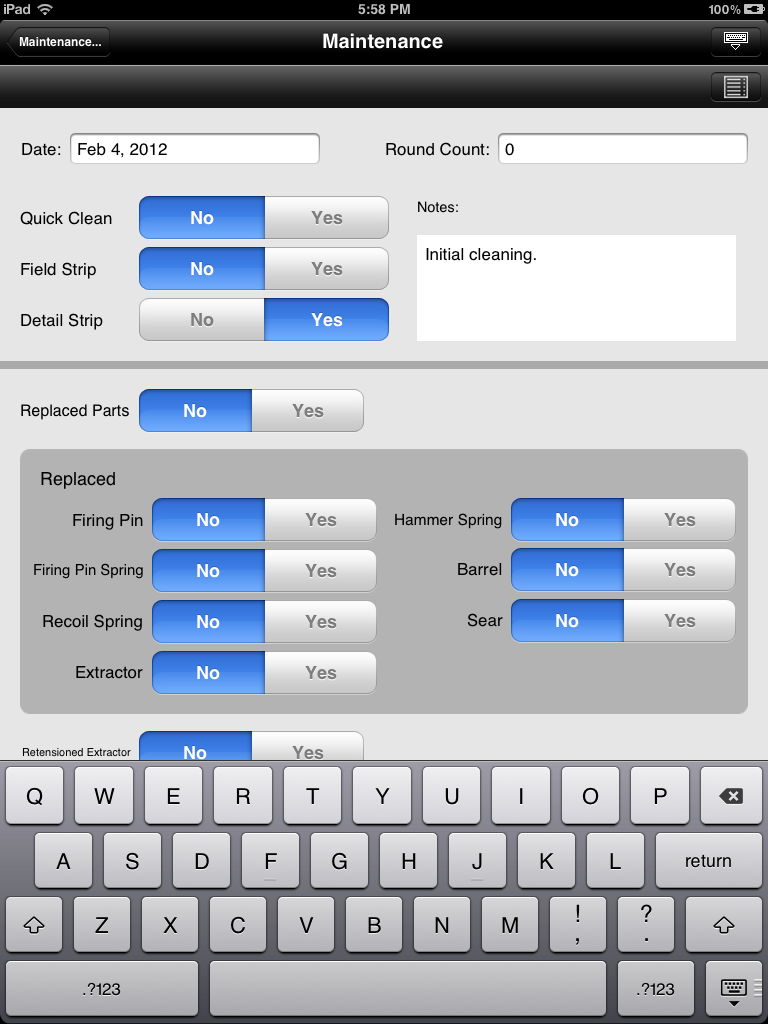
There are controls to quickly mark the most common maintenance items. The "Notes" field is where you specify information that is not represented in the "No | Yes" buttons.
Tap the "Maintenance..." button at the top right to go back to the maintenance history list.

Tap "Weapon" to go back to the weapon's detailed view.

You can also add a photograph of your weapon. Tap the camera button in the top button bar.

You can now take a new photo or use an existing photo from the camera roll. The "trash" button disassociates an image, it does not delete it from your camera roll. GL+P makes a low resolution copy of you image and stores it in the database. I keep my original images in case I need a hi-resolution image for other purposes.
Tap the "album" button, the button to the right of the "camera" button.

Navigate to the image you want and tap it.

If you are done entering information for your weapon you can navigate back using the navigation button at the topmost left position or you can double tap "Weapons" in the tab bar at the bottom of the app's view.

That is the end of this introduction to entering a weapon into Gun Log +P.
No comments:
Post a Comment