
Gun Log +P is no longer available for sale.
UPDATE:
Users of Gun Log +P should switch to Gun Log or Gun Log SPC.
Gun Log SPC is the most similar to Gun Log +P and it is the recommended app. Gun Log SPC does everything Gun Log +P does except sync with iCloud. Gun Log does not print or email. Be aware of those differences.
I will make Gun Log and Gun Log SPC free in the app store until December 20th 2015 to allow users to make the switch. Gun Log +P will still be available in the App Store for those that have purchased it. If it is not available please read further below and contact Apple.
Gun Log +P is discontinued. For 20 days Gun Log and Gun Log SPC was free so that Gun Log +P users could switch apps. During that time 1,066 users downloaded Gun Log or Gun Log SPC. There are 5,160 users of Gun Log +P. Apple does not give me any contact information so there is no possible way to contact any of the users. I am sorry if you did not know the product is discontinued and you missed the opportunity to get Gun Log or Gun Log SPC for free. I did the best I could to get the word out. My little company lost around $1800.00 in revenue during the giveaway period, but I didn't mind, it was the best I could do.
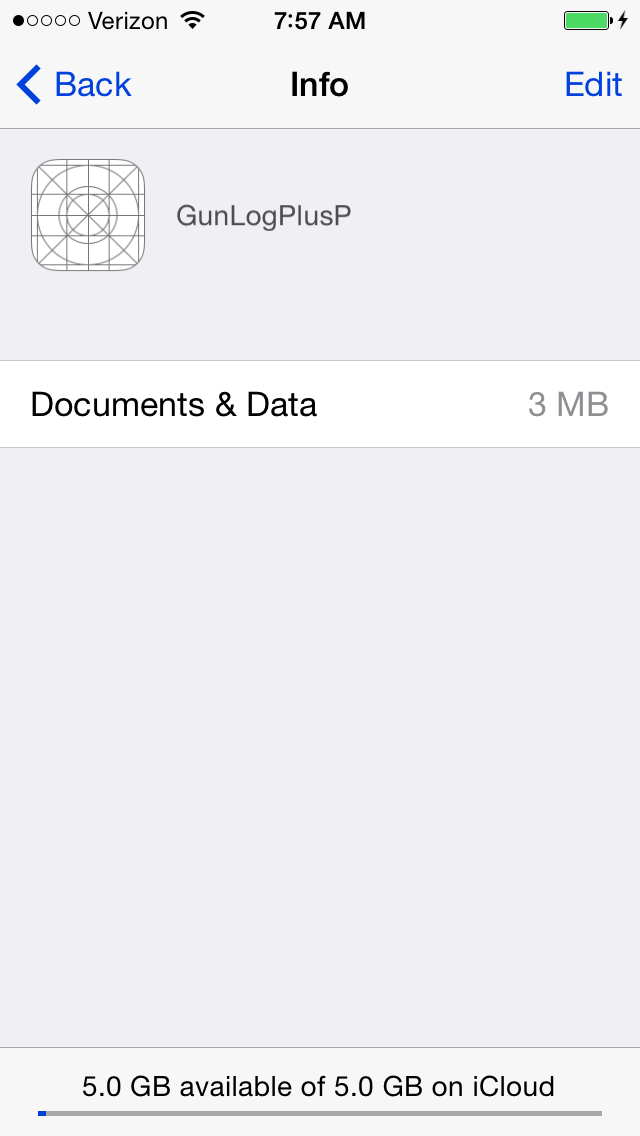
If you are still using Gun Log +P go into the iOS Settings App and turn off iCloud for Gun Log +P and it will behave exactly like Gun Log SPC at that point. Follow the directions on the web site to copy your CoreDataUbiquitySupport folder and find the Shooting_Buddy.sqlite file inside that folder. Copy just the file back to Gun Log +P and with iCloud turned off the program should work the same as Gun Log SPC. This approach seems to work, but it is honestly untested and some users may have to re-enter their data.
Users of Gun Log +P should switch to Gun Log or Gun Log SPC.
Gun Log SPC is the most similar to Gun Log +P and it is the recommended app. Gun Log SPC does everything Gun Log +P does except sync with iCloud. Gun Log does not print or email. Be aware of those differences.
I will make Gun Log and Gun Log SPC free in the app store until December 20th 2015 to allow users to make the switch. Gun Log +P will still be available in the App Store for those that have purchased it. If it is not available please read further below and contact Apple.
The reason Gun Log +P is no longer available is because sales of the app do not support the costs of support. Gun Log +P uses iCloud and it appears that it either works with no problems or for some it never seems to work and there is no rhyme or reason to the issues nor is there a clear solution. I have sent my code to Apple for review and the Apple developers said that my code was correct to their specifications, so there is nothing more than I can do.
Also, Gun Log +P does not account for 1/4th of the total sales of the Gun Log family of apps and it accounts for 99% of all support issues.
Please make sure you download Gun Log or Gun Log SPC while it is free. I am doing this as a service to the Gun Log +P users at a total loss of revenue for my company for twenty days.
Moving Your Data to Gun Log or Gun Log SPC
Follow these directions to move your data from Gun Log +P to Gun Log or Gun Log SPC.
 |
| Connect your device to a computer running iTunes. |
 |
| Select the "Device" button at the top. |
 |
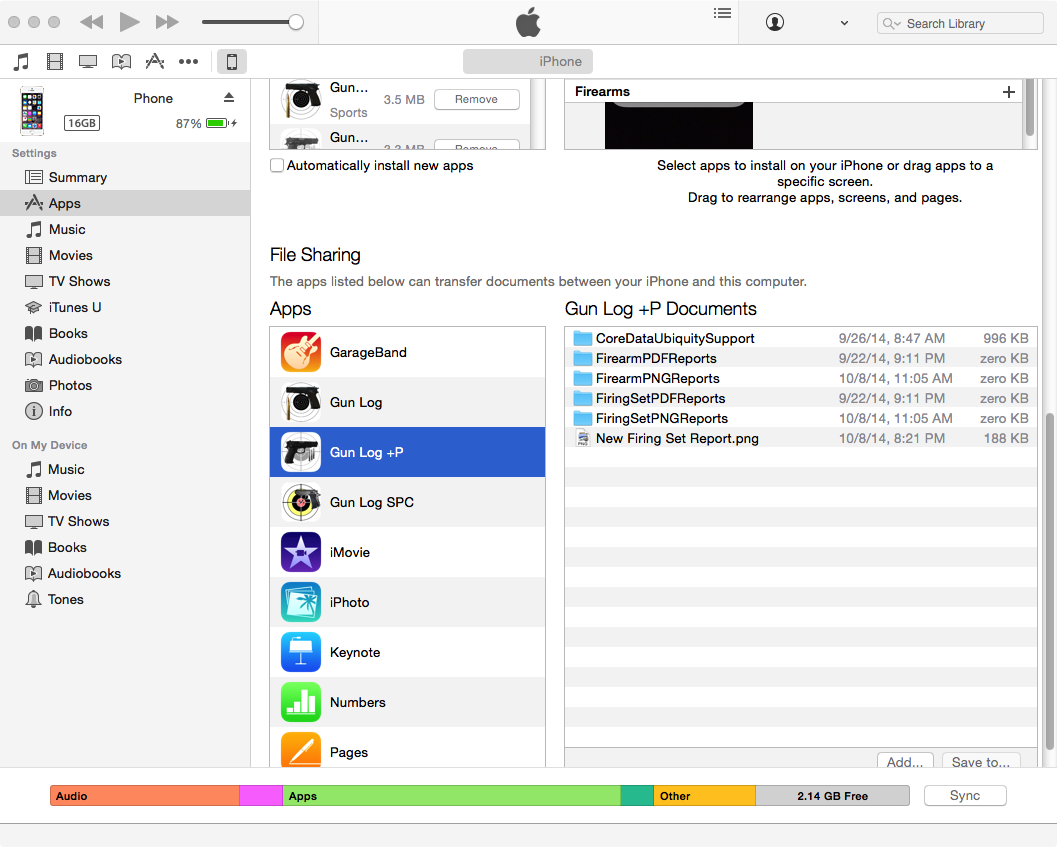
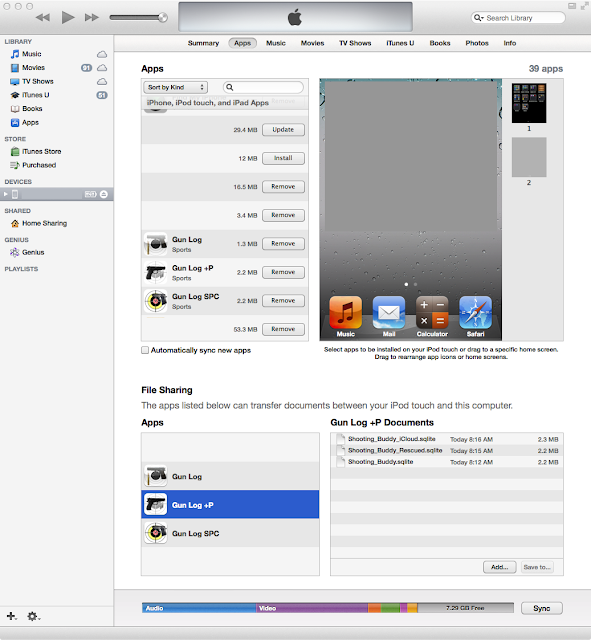
| Select Apps and scroll the iTunes content on the right down until you see "File Sharing" |
 |
| Save "CoreDataUbiquitySupport" to your computer |
Once you have copied the CoreDataUbiquitySupport folder from Gun Log +P (via iTunes) and have saved it to your computer then open the folder and find the "Shooting_Buddy.sqlite" file.

After you have found "Shooting_Buddy.sqlite" inside of the sub-folders of the CoreDataUbiquitySupport folder, drag Shooting_Buddy.sqlite into iTunes with Gun Log or Gun Log SPC selected.

Once you have copied the "Shooting_Buddy.sqlite" file into Gun Log or Gun Log SPC then press the "Sync" or "Apply" button in iTunes to save the file to your device.
Gun Log and Gun Log SPC do not use iCloud, so you will need to manually copy the file to all of your devices.
If you are using iTunes on Windows select the CoreDataUbiquitySupport folder and then look down to the right and click the "Save to..." button. You may have to update Windows with all of the latest updates and make sure you are using the latest version of iTunes.

Availability on the App Store
I contacted Apple support concerning the issue where the App wasn't for sale on the App Store and customers who had previously purchased the app could not download it after deleting the app or restoring their device. This is the official response from Apple:Thank you for your inquiry regarding the availability of your deleted app for customers who have previously acquired the app.
I am certain that this is something that they expect would be available. We want to make sure that they can download an app that they have acquired.
Customers that are having issues downloading previously purchased apps will need to contact iTunes Store Support. The app should be available to them.
http://www.apple.com/support/itunes/
iCloud Drive
I have switched to using iCloud Drive. Once you switch to iCloud Drive you can not go back to "Documents & Data".If you are a new user of Gun Log +P (GL+P) and have been experimenting with syncing data between two devices and things are out of sync, try the following, but realize that this removes all of the data and you will have to re-enter the data:
- Delete app from both devices.
- From settings app, in iCloud - Storage - Manage Storage - Gun Log +P - Edit - Delete All.
- Wait a couple of minutes.
- Now hold power button and home button until you see Apple logo. This is a restart with a reset. Do it on both devices.
- Reinstall app from App Store. You will find it in the purchased - not on this iPhone. Tap the cloud button.
- Launch app and enter a firearm. Open app on other device and wait.
Before Updating, Resetting, or Restoring Your iOS Device
With the upcoming release of iOS 9 and with any update, reset, restore, or major change to your device I recommend backing up your data.
|
| Connect your device to a computer running iTunes. |
|
| Select the "Device" button at the top. |
|
| Select Apps and scroll the iTunes content on the right down until you see "File Sharing" |
|
| Save "CoreDataUbiquitySupport" to your computer |
Welcome to the new Gun Log +P
You need to decide if you are going to use the iCloud functionality which automatically synchronizes data across all of your devices or not use iCloud functionality and then setup the app appropriately.
I personally use Gun Log SPC for my real database of firearms and ammunition. I do not like to be dependent on external servers to be functioning for me to access my data. I do follow Apple's guidelines on using iCloud services and I work directly with Apple Support to make sure that my code in the program is using iCloud correctly. However, 90% of the complaints about any of the Gun Log family of apps are centered around Gun Log +P and iCloud, and you should be aware of that. There are several thousand Gun Log +P users and there are a handful that have lost their data because of iCloud. I just want everyone to know why I use Gun Log SPC.
Running with iCloud Functionality
If you have a backup of the "Shooting_Buddy.sqlite" file from the previous version of Gun Log +P (or any of the Gun Log apps) there is a way to try and "seed" the old data into the new iCloud implementation. If you don't have a lot of data from the previous version it might be easier just to re-enter the data instead of trying this somewhat tedious process of seeding the data.If you do not want to attempt seeding the iCloud data then skip down to "Getting Started".
If you do want to attempt seeding the iCloud data then go to Addendum Two at the bottom of this site and follow the instructions precisely and carefully.
Running without iCloud Functionality
If you are not going to use iCloud then I recommend you use Gun Log SPC. Gun Log SPC was designed specifically for those that do not want iCloud integration.If you are going to use GL+P without iCloud then go to Addendum 3 found much further down in this blog post. All you need is a backup copy of your "Shooting_Buddy.sqlite" database file and then follow the instructions listed below.
Getting Started
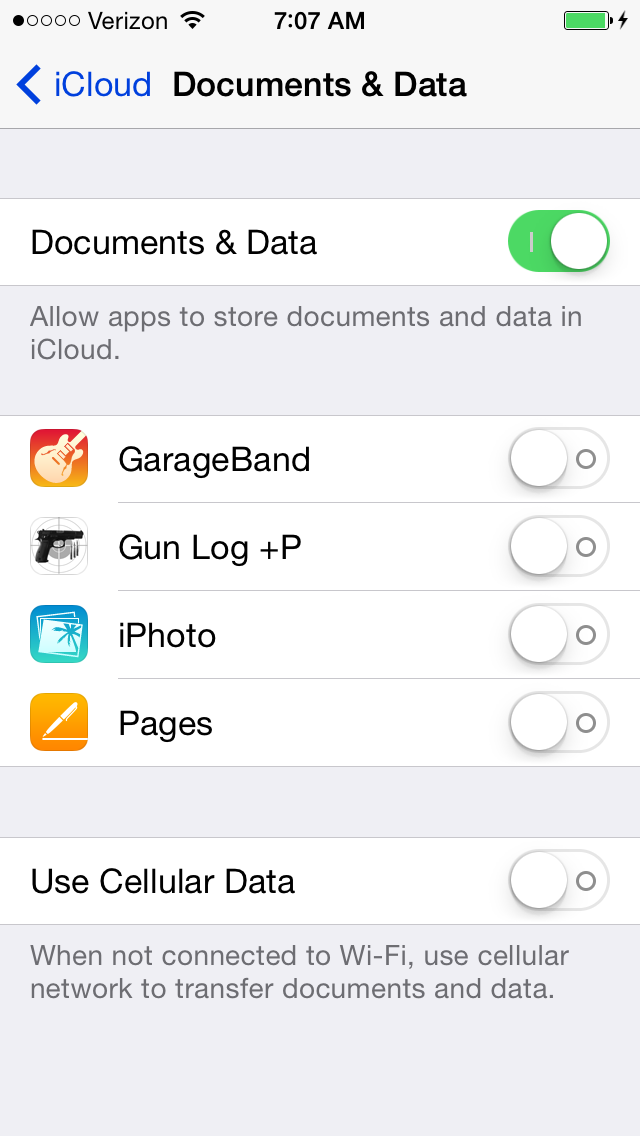
(If you are not "seeding" iCloud or transferring a backup database continue reading, otherwise go to the addendum's at the end of this blog)Before you run GL+P for the first time go to the App Settings application and go to the iCloud entry and enable "Documents & Data". If you are not going to use iCloud then don't use GL+P, instead use Gun Log SPC.
If you use GL+P with "Documents & Data" disabled the app will make a local database and use it. If you later turn "Documents & Data" on the app WILL NOT transfer your data to iCloud. You will have to re-enter your data. Therefore it is important to decide how you are going to store your data, in iCloud or locally, from the onset.
If you do not see "Documents & Data" as a setting, I have found that some versions of iOS 8 on certain devices seems to have a bug. Turn Passbook on and that may make the Documents & Data setting appear. Also, if you have chosen iCloud Drive the setting may not be available.
If you are using iCloud Drive go to the Settings App -> iCloud -> iCloud Drive (make sure it is on if you want to use iCloud Drive) -> and turn on Gun Log +P.


Also, if you want to have an extra layer of security you can set a passcode on the app. It is up to you to turn this feature on. You do this by launching the iOS Settings app and then you scroll down and find the app and tap it and then on the next screen you turn on the passcode.


The "method" behind the App
Let me explain how to "think about" the app.Firearms
Firearms have:- Details such as make, model, caliber, a photo, serial number, purchase info, sale info, and more.
- Configurations which specify sight height, barrel length, twist rate, a photo, a list of accessories, and more.
- Maintenance records which specify details of the type of maintenance performed and when.
- Drop tables where external ballistics are calculated for a weapon, a configuration, and an ammunition.
Ammo
Ammo has make, name, caliber, type, purpose, round count, ballistic coefficient, muzzle velocity, and much more.Ammo is used in firing sets and several reports.
There has been some confusion around how to use the round count and keep up with how many rounds fired. In the ammo view you enter how many rounds you obtained (purchased, hand loaded, etc.) As you use ammo in a firing set the firing set records the rounds fired. The number doesn't decrease in the ammo view. The usage is shown in the ammo reports such as "Rounds Fired by Ammunition" and "Rounds Count by Caliber".
When I purchase more bulk range ammo I just open my entry for that ammo and increase the round count because I don't really want to track each lot by creating a new entry.
When I purchase hunting ammo I enter a new ammo entry because I do want to track the use and performance of that ammo.
Firing Session
A firing session is a day at the range or a day in the field. During a firing session you may set up various targets and use different firearms. Therefore a firing session can have many firing sets recorded.Firing Set
The firing set is the "heart" of the app. This is where you bring your firearm, a specific firearm configuration, and ammo together.A firing set has:
- Firearm
- Firearm configuration
- Ammo
- Fields such as set type, firing grip, distance to target, rounds fired, group size, weather and lighting conditions, and much more.
- Photo of your target or results.
- Failure entry where you can capture any type of failure you experience. This is automatically associated with the firearm, firearm configuration, and the ammo. This allows you to track problems and analyze issues.
Accessories
An accessory entry has details such as description, type, serial number, count, and other information. An accessory can be associated to many firearm configurations. You have to enter the accessory first and then go to your firearm and open the configuration that uses the accessory and add the accessory.Reports
The reports area is where data is grouped, sorted, and organized. Suppose you want to find the entry where you had a failure to eject for a pistol. Instead of trying to remember which firing session has the firing set that has the failure just open the reports and tap "Failures by Firearm" or "Failures by Ammunition".User Interface
There are five top level views in GL+P:- Firearms
- Ammo
- Sessions
- Accessories
- Reports
If you want to see screen shots for iOS6 and iOS7 then follow this link.
Firearms
GL+P looks just like the other Gun Log Apps except the Firearms color is different. The following information will contain screen shots from the various Gun Log apps, and the main difference will be the color.
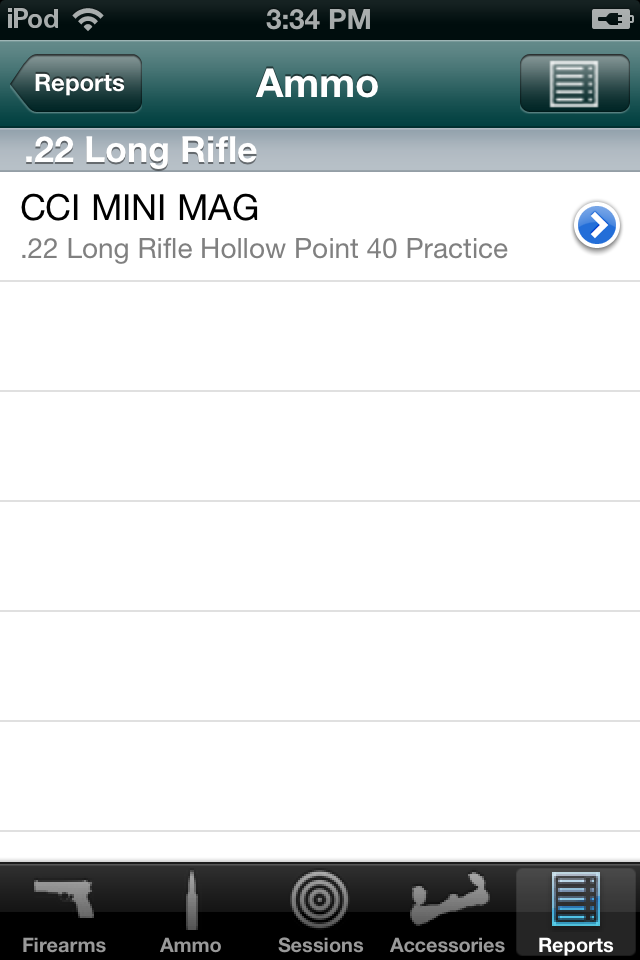
Ammo
 |
| iOS 7 |
Sessions
 |
| iOS 7 |
Accessories
 |
| iOS 7 |
Reports
 |
| iOS 7 |
 |
| iOS 7 |
 |
| iOS 7 |
User Interface Elements
The app has many features. Instead of explaining every button and view in great detail I will explain the common elements.
The image below shows the UI elements of the main Firearms view.
Tap the "+" button on the right to create new entries. The "+" button is used through out the app to create new entries.
Tap the "Edit" button on the left to remove entries.
Next to the title "Firearms" is the info button. This button brings up important information on how to backup your data and find this tutorial.
Below the title of the view and at the top of the list of firearms is a button bar.
The icon on the right, just below the "+", is the report button. This button is used throughout the app to generate a report based on the contents of the current view.
The buttons that are grouped together control how the list is displayed. These buttons may control sorting or filter out items. For the firearms view the Make | Caliber controls grouping of items. The All | Owned | Sold filters the items to show all of your firearms or just the ones you still own or those you have sold.
 | |
| iOS 7 |
Notice the Ammo view uses the same layout pattern as the Firearms view. Some views, like Ammo, have the ability to duplicate entries as a convenience. Tap the "Edit" button on any list and if a blue "+" button appears on the right of an entry you can tap that and it will create a new entry and duplicate the major field values for that entry.
Your ammo list can become very long. You can filter and only show ammo on hand, that is ammo that has not been all used in a firing set.
Notice the similar pattern of layout and use of UI elements for all of the similar views in the app.
 |
| iOS 7 |
If you navigate into a firearm's details you will see these controls (image below) at the top of the view.
On the left is the standard iOS button to navigate back from whence you came. On the right is a Cancel button. If you hit the Cancel button it does not delete the entry, it just doesn't save any changes since you entered the screen. Anytime you navigate to another window the app automatically saves data, so cancel can seem confusing at times. For instance if you entered some data in a firearm and then tapped the button to add a photo the firearm would automatically save and when you come back from the photo if you hit cancel it would seem that nothing was canceled.
The buttons from left to right:
The pistol with a silencer represents a "Firearm Configuration". This is where you can create multiple configurations. A configuration is where you attach accessories to a firearm, describe multiple caliber setups, etc.
The oil can icon represents the maintenance logs.
The reticle icon is where you can create ballistic drop tables for the firearm for quick access.
The camera icon is where you associate a photo.
The report icon (as through out the application) will generate a report for the firearm.
 |
| iOS 7 |
Pickers are views where you select "something". Below is the top of one of the Ammo Pickers. If you have already picked a weapon that has the caliber specified and you bring up the ammo picker it will filter the ammo based on the weapon's caliber. If you do not see any ammo in your list just turn off the Caliber filter. The On Hand | All filters if the ammo by availability (rounds you still have on hand).
 | |
| iOS 7 |
Below is the header for a ballistics drop table.
The icon on the left is used to generate the data.
The segmented control with . | .. | ... | .... controls how much detail are shown in the results. More dots means more detail.
The control with 300 | 1000 | 2000 limits how far to calculate. Values are in yards.
 | |
| iOS 7 |
There
isn't much the app doesn't already do. Most of the feature requests I
receive are for functionality that already exist in the app. For
instance, one user asked if I could change the app to associate
accessories to firearms. It already does that. Accessories are attached
to a Firearm Configuration. If you think about it, that is what a
configuration is, a firearm and its accessories.
Firearm View
Adding
a new firearm takes you to the firearm view or sometimes called a
detail view because the details are shown and entered there.
Fields,
UI elements where you enter data, are edited by tapping in the field
and the appropriate key board will appear. Some fields have buttons next
to them. Those buttons will bring up a picker so that you can select a
value instead of typing. This pattern of button next to field to bring
up a picker is used through out the app. Further below there is a screen
shot of the "Make" picker.
| iOS 7 |
Tapping the configuration button (the pistol with a silencer) brings up the configurations list. A default entry is created when a firearm is created. You can use it or delete it.
 | |
| iOS 7 |
Tapping the entry takes you to the configuration details view. A configuration can have a photo or a list of accessories associated. To add an accessory just tap the Accessories button and then add accessories to the list that is shown. You should enter your accessories first.
| iOS 7 |
Tapping the photo button brings up a view where you can take a picture or select a picture from your camera roll.
 |
| iOS 7 |
iOS 6 requires you to give permission to an app that wants to access your photos.
After you have selected a photo it will display as shown below. Note that the trash button removes the photo from the app and not from your camera roll / photos. The app stores a reduced quality image therefore I recommend keeping your high quality photos in your camera roll.
 | |
| iOS 7 |
The Make Picker
As mentioned above in the weapon detail view if you tap a button next to a field it will bring up a picker. Below is the Maker picker.Notice the buttons at the top. The All | Default | Custom filter the values of the picker.
 |
| iOS 7 |
Selecting Custom shows there are no custom or user defined entries. Just tap the icon on the right, it is the compose button.
 |
| iOS 7 |
Tap in the field next to the blue "+" button.
 |
| iOS 7 |
Type in a custom value.
 |
| iOS 7 |
Tap the blue "+" button to commit the value to the list.
 |
| iOS 7 |
Tap the done button at the bottom right.
 |
| iOS 7 |
Now you have a custom entry. These steps work for all of the pickers that allow custom values. Tap the new entry to select it and tap done.
 |
| iOS 7 |
Now you have entered a make for the firearm. You could have just typed the value in the field, but if you have more than one of that make using a custom value in the picker will save time.
 |
| iOS 7 |
Ammo
An Ammo entry is an entry or log of an acquisition of ammunition. If you purchase 25 rounds of ammunition for $18.00 you will log a round count of 25 and a price of 18. You do not edit the round count if you use the ammo in a firing set. The reports of the app will take every firing set's value for rounds fired and subtract that value from the ammo's round count to give a report of rounds remaining.I use the ammo entries in two manners.
- Bulk entry. I do not enter a new ammo when I buy more range ammo of the same type. I just edit the existing entry and increment the values that I want to track which is the round count. For example, if I buy 50 rounds of UMC 9mm FMJ and later I buy two more boxes for an additional 100 rounds I go to the ammo entry and change 50 rounds to be 150 rounds. I do not want hundreds of entries of ammo for range or plinking ammo.
- Lot entry. For hand loads, match ammo, hunting ammo, and other ammo where I am seriously tracking performance and accuracy I enter the ammo by lot. Sometimes a lot is just a box of ammo and other times it is several boxes with the same lot number or several hand loaded rounds.
To create a new entry, just tap the "+" button. This same method is used through out the app.
|
| iOS 7 |
Tap the make button...
 |
| iOS 7 |
... pick a value...
 |
| iOS 7 |
... and you have entered the make for your ammo.
 |
| iOS 7 |
The name field doesn't have a picker, so you can type a value if you want. There are no fields in the entire app that require you to enter data. You can enter as little or as much as you want.
 |
| iOS 7 |
Reports
Continuing with the ammo entry tap the report button at the right, just below the cancel button. |
| iOS 7 |
Email and Printing Reports
A text report is shown. You can email or print the report.
 |
| iOS 7 |
Tapping the compose button, the left button of the two, brings up the email. Tapping the action button, the right button of the two, brings up the printer options.
PDF Reports
PDF Reports can be generated for firearms or firing sets.
To generate a firearm PDF report select a firearm and tap the report button at the top right.

Tap "PDF Report".

To generate a firing set PDF report open a firing set and tap the report button at the top right.

Tap "PDF Report"

You can find your saved PDF Reports by going to the Report tab of the app by tapping the Report button at the bottom right and then scroll down until you find "Saved PDF Reports"


Firing Sessions
Firing sessions are where you keep your firing sets. A session is like a day at the range and a set maybe three rounds at a target or whatever you deem to be a set.
Same method as everywhere else in the app, just tap the "+" button.
 |
| iOS 7 |
A session is typically at one location. Enter in the data that makes sense for your session.
Tap "Go to Firing Sets".
| iOS 7 |
Firing Sets
Tap the "+" button to create a set. A firing session can have multiple sets.
| iOS 7 |
In the firing set you can save a photo of the target, record failures, or bring up a drop table. The firing set is where a firearm and a particular firearm configuration is used with a particular ammo. By entering in as much data as possible reports can be generated to show how many failures a firearm has experienced, or how many failures with a particular ammo. A report can show how many rounds of ammo you have on hand or the smallest group size for a specified distance.
| iOS 7 |
Here you have to use pickers to enter the firearm, configuration, and ammo.
Here is the weapon picker.
 |
| iOS 7 |
Here is the configuration picker.
 |
| iOS 7 |
Here is the ammo picker. Notice that our entries for CCI Mini Mags did not show up. This is because we didn't enter a round count in the ammo, so just tap "All".
 |
| iOS 7 |
Once you tap all the ammo entries appear.
 |
| iOS 7 |
So this is what a firing set looks like after picking a few values.
 |
| iOS 7 |
There are more details about Firing Sessions and Firing Sets below.
Accessories
Just tap the "+" button to enter an accessory. You have to enter an accessory here if you want to pick an accessory in the firearm configuration.
 |
| iOS 7 |
You can add a photo if you want or create a text report.
 |
| iOS 7 |
You can associate an accessory to a firearm configuration. Just go to the firearm and then go to the configurations lists and choose a configuration. To add an accessory just tap the Accessories button and then add accessories to the list that is shown. You should enter your accessories first.
Reports
 |
| iOS 7 |
Rounds Count By Caliber Report
A very useful report is the Rounds Count by Caliber report. This report allows you to see how much ammo you have on hand.When the "All" filter is selected you see all of your ammo.
 |
| iOS 7 |
If you select "On Hand" it will show you the ammo that you have "some on hand" or available.
 |
| iOS 7 |
If you select "≤ 50" it will show you the ammo where you have 50 or fewer rounds still on hand. If you select "≤10" it will show you the ammo where you have 10 or fewer rounds still on hand.
 |
| iOS 7 |
If you select "0" it will show you the ammo where there are none on hand, you are out of, it's all gone!
 |
| iOS 7 |
Drop Tables
I have already entered data for "Drop Table for User Specified Values". You can add your own entries by just tapping the "+" button. Select the entry...
 |
| iOS 7 |
... and you see the details.
 |
| iOS 7 |
This entire view scrolls, so just tap and drag to scroll and the table. Tap the button on the left, the circular arrow button to perform the calculation.
 |
| iOS 7 |
The buttons from left to right:
Calculate, detail level, and maximum yardage.
The detail level changes how many values are displayed in the table. You wouldn't want 1 yard increments out to 2000 yards. Change the detail selection and hit the calculate button to see how the results change.
 |
| iOS 7 |
Here are the results...
 |
| iOS 7 |
Scroll down a bit and you will see that when the bullet crosses zero the entry is in bold.
 |
| iOS 7 |
Firing Sessions Walk Through
The Gun Log Apps are designed to be range logs. When you go to the range think of that as a "Firing Session". Each different firearm you use, or each different ammunition, or different distance, those are "Firing Sets". You may have many firing sets in one firing session.
Let's walk through this.
Normally, you should have entered a firearm and some ammo before you go to the range and log a firing session. When you are out with a firearm you don't want to be distracted entering data that you could have done beforehand.
Here is an example with some firearms entered. These screen shots are from Gun Log SPC running on iOS 6. The functionality is the same with all of the Gun Log apps.
 | |
| iOS 6 |
And here is some ammunition entered.
 |
| iOS 6 |
Firing sessions are found by touching the third tab from the left. I already have one entry so lets make another by tapping the "+" button at the top right.
 |
| iOS 6 |
When you make an new firing session by pressing the "+" button the app goes directly into the new firing session. I will set the location to the "Back Yard" and the type to "Practice". You don't have to enter anything, but if you don't enter data it will be more difficult to find things later. Tap the button "Go to Firing Sets".
 |
| iOS 6 |
To create a new "Firing Set" tap the "+" button at the top right.
 |
| iOS 6 |
Select a firearm, firearm configuration, and ammo by tapping the appropriate button.
 |
| iOS 6 |
Let's pretend we are shooting a Ruger 10/22 and are using CCI Mini Mags. This should be something most everyone is familiar with.
Just go through and enter any data that is meaningful to you.
 |
| iOS 6 |
When shooting a rifle I don't have a special "Firing Grip", so I leave it blank. When shooting hand guns I find it important to log the grip style.
 |
| iOS 6 |
Enter in how many rounds you fired. Don't forget that you can dismiss the keyboard by tapping the "dismiss keyboard" button at the top right.
 |
| iOS 6 |
If you are using version 7.1.0 or higher you can dismiss the keyboard by pressing the done button that is found at the top of every keyboard.
 |
| iOS 7 |
The group size is important to log if you want to track grouping. Here I enter 1.25. The units doesn't matter. I enter group sizes in inches, but you can enter them in miles or kilometers if you want! Just always do it the same for all of your firing sets.
 |
| iOS 6 |
I enter 25 for distance. I always log distance in yards. Again, it doesn't matter if you enter meters or feet, just always use the same unit of measure.
 |
| iOS 6 |
If you want to track accuracy then scroll down a little further and enter "Point of Impact" (POI) data. The POI location describes if you were shooting high, left, right, etc. It is entered using "clock" values. 12:00 would mean you were shooting straight up high. 3:00 would mean you were shooting to the right. In this case I was shooting low, so I enter 6:00.
POI distance is how far from the point of aim (POA). If you were shooting at the dead center of the target and you were two inches low then enter 2 for the POI distance.
 |
| iOS 6 |
Well that is enough information for this example. Tap the "Sets..." button at the top left to go back. Don't accidentally tap the "Cancel" button on the top right!
 |
| iOS 6 |
To make this interesting we need more than one set. Since I am going to shoot the same gun using the same ammo just tap the "Edit" button near the top on the left. This will cause the list of sessions to change and show two buttons, a "-" button (to delete the entry) and a "+" button to duplicate the entry. Tap the "+" button.
 |
| iOS 6 |
The duplicated entry will have many of the fields carried forward, but not all.
 |
| iOS 6 |
For this firing set I will enter 3 for the group size and keep the distance at 25. Let's say that we shot low at the 5:00 position and were again 2" from point of aim.
 |
| iOS 6 |
Go back to the "Sets..." and you see we have two entries. You can tell a lot from the table entry. The entries show we were shooting a Ruger 10/22 that is chambered in .22 Long Rifle. Also we were using the factory configuration (Fact..). We were shooting CCI ammo, .22 Long Rifle caliber, 40 grain weight, hallow points, at a distance of 25 yards, expending 10 rounds.
 |
| iOS 6 |
Now tap the "Reports" tab button at the bottom right of the app. Then tap "Firing Sets For Grouping by Firearm".
 |
| iOS 6 |
No pick which firearm you are interested in. In this case I pick the 10/22.
 |
| iOS 6 |
Here we can see a summary of our firing sets, sorted by distance and group size.
 |
| iOS 6 |
Go back to "Reports" and scroll down a bit to find the Ammunition Reports. Tap "Firing Sets for Grouping by Ammunition".
 |
| iOS 6 |
Pick the ammunition.
 |
| iOS 6 |
We we can see the firing sets where the ammunition was used sorted by distance and group size.
 |
| iOS 6 |
This ends the tutorial on Firing Sessions and Firing Sets. As you can see this app is not just a simple inventory app! Not covered is the ability to log failures and store a photograph of the target. If you log failures then you can run reports on failures as well.
Conclusion
Thank
your for choosing Gun Log +P. It is one of the most feature rich
firearm apps available. I hope you enjoy the app and find it useful.
Learn how the app works at home, don't wait until you are at the range
to try it out. When you are at the range you should be focused on what
you and others are doing, not some app!
Above
I described some of the features of the app. I mostly wanted to show
how things are done. There has been a lot of effort to make sure the
"how" is consistent through out the app. Make sure you look around a
bit, tap the various buttons, and explore the full depths of the app's
functionality.
Remember,
after paying the bills, I use revenue from these apps to purchase my
firearms related materials. Therefore, I owe you my thanks.
Thank you.
Addendum One
Error Logs
If you sync your iOS device with iTunes on a Macintosh computer the crash reporter log files are copied to your computer.
To find the log files in the Finder click the "Go" menu and hold down the option key and select "Library".
Go to Library/Logs/CrashReporter/MobileDevice/
Go into the folder for your device and look for logs associated with Gun Log SPC.
Email the crash logs and I can see if there is information that will help resolve any issues.
Addendum Two "Seeding" the iCloud Data
If you have a backup of the "Shooting_Buddy.sqlite" file from the previous version of Gun Log +P (or any of the Gun Log apps) there is a way to "seed" the old data into the new iCloud implementation. If you don't have a lot of data from the previous version it might be better just to re-enter the data instead of trying this somewhat complex process.First you need to have a copy of the database file named "Shooting_Buddy.sqlite" (or Shooting_Buddy_icloud.sqlite or ShootingBuddy_recovered.sqlite). If you do not have this file there is no need to follow these steps.
Step one. Connect iOS device to computer using the USB cable and open iTunes.
Step two. Select you iOS device in the left panel of iTunes. (The left panel is called the Sidebar. If you do not see the Sidebar go to the View menu and "Show Sidebar".)
Step three. Select "Apps". "Apps" is near the top middle.
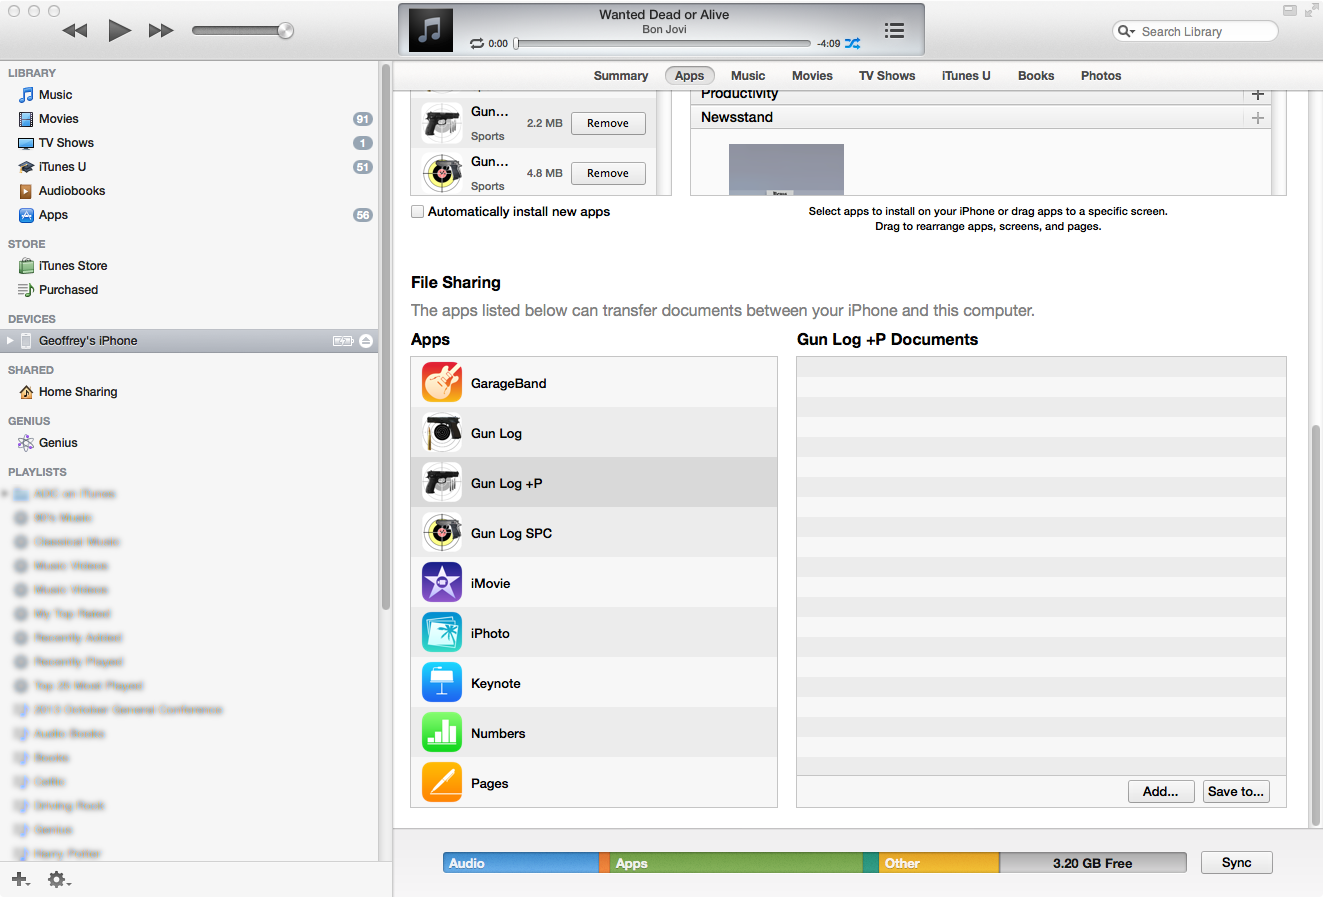
Step four. Select "Gun Log +P". It is listed under "File Sharing" and below "File Sharing" is "Apps".
Step five. Select "Shooting_Buddy.sqlite". It depends on the version of the app, but the file could be named "Shooting_Buddy.sqlite, Shooting_Buddy_iCloud.sqlite, or Shooting_Buddy_recovered.sqlte". If more than one file is on your device backup all of them and then work with the file that has the largest size.
Step six. Drag the sqlite file to your computer desktop or some similar location.

Here is a screen shot of the new iTunes. You have to select your device to see the apps. It is a tiny icon up at the top left, under the play controls, the seventh icon.
If you have a copy of "Shooting_Buddy.sqlite" then follow the steps listed below.
On Every Device that will run Gun Log +P
- Make sure you have a good Wi-Fi connection.
- Install Gun Log +P but do not run it yet.
- Make sure "Documents & Data" is turned on by going into the App Settings app and go into the iCloud settings. If you are using iCloud Drive go to the Settings App -> iCloud -> iCloud Drive (make sure it is on if you want to use iCloud Drive) -> and turn on Gun Log +P.


On One Device that will Run Gun Log +P
Do the following steps on only one of the devices that will run Gun Log +P. Do these steps only once. If you miss a step or something goes wrong you will have to delete Gun Log +P from every device and clear the Gun Log +P data from iCloud.- Make sure you have a good Wi-Fi connection.
- Make sure you have enough iCloud storage space to hold the size of the "Shooting_Buddy.sqlite" file. If you run out of storage during the process I have no idea what the results would be.
- Connect your iOS device to computer using the USB cable and open iTunes.
- Select your iOS device in the left panel of iTunes. (The left panel is called the Sidebar. If you do not see the Sidebar go to the View menu and "Show Sidebar".)
- Select "Apps". "Apps" is near the top middle.
- Select "Gun Log +P" listed under "File Sharing".
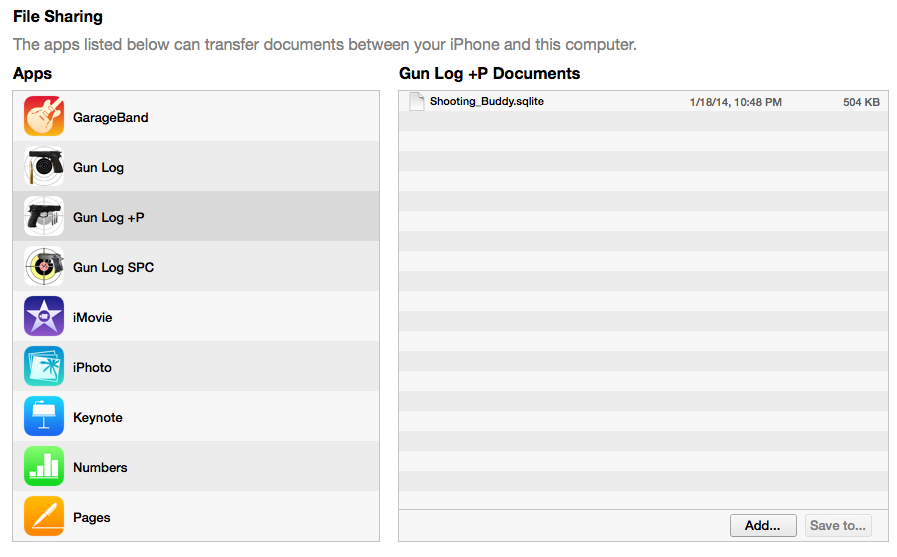
- Drag your copy of "Shooting_Buddy.sqlite" into the panel "Gun Log +P Documents".
- Rename "Shooting_Buddy.sqlite" to "seed.sqlite". It has to be spelled exactly "seed.sqlite" with all lower case letters. You can rename the file before you drag it into iTunes as well.
 |
| iTunes Selecting Gun Log +P App |
 |
| After Dragging Shooting_Buddy.sqlite file to iTunes |
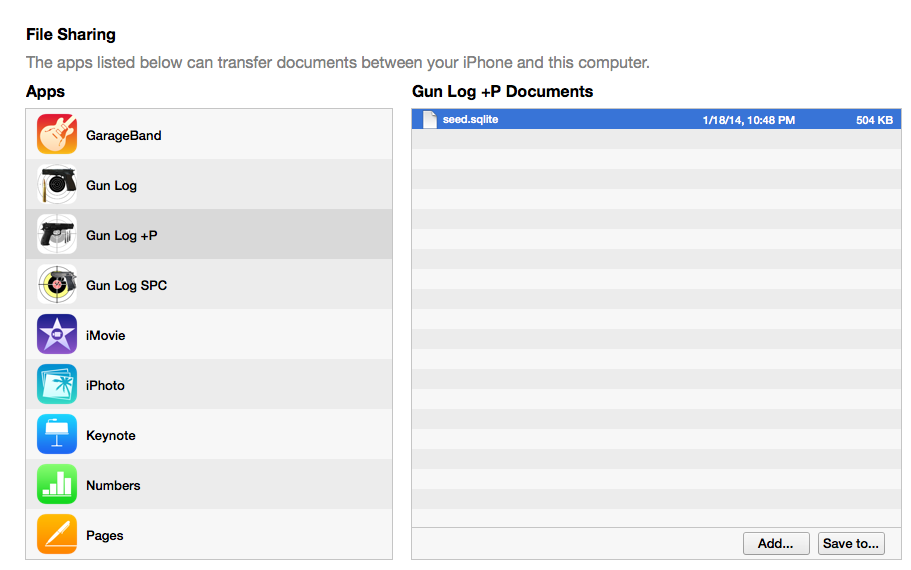 |
| Rename file to "seed.sqlite" |
Now everything is ready to run Gun Log +P.
Launch Gun Log +P. If there are no errors you should see the app launch with the data loaded. It might take several minutes for the data to upload into the iCloud server so leave GL+P running as the foremost application on your iOS device, especially while you wait for your other devices to sync with the data.
Launch Gun Log +P on all of your other devices. Keep GL+P running and wait a few minutes and the data should be transferred from the device you used to "seed" the data to the iCloud servers and then back down to your other devices running GL+P v 7.1.1. (It does not sync or work with GL+P 5.9.)
You will see in iTunes that the "seed.sqlite" file has been renamed to "seeded.sqlite". Also there will be several new folders. You should delete the "seeded.sqlite" file.
Do not run this process twice. If you do you will end up with duplicate records and use lots of iCloud storage.

If the "Seed" process has Failed
If there has been an error of any type in the seed process (the steps listed above) then there are several things that now has to be done. Remember the warning that if there is an error you will have to manual clear out everything that was done. If you do not have a backup of the data you must make one.- Make sure you have the sqlite file backed up on your computer. (Shooting_Buddy.sqlite, Shooting_Buddy_iCloud.sqlite, or Shooting_Buddy_recovered.sqlite).
- Delete Gun Log +P from every device.
- Go into iCloud settings and delete the "Documents and Data" for Gun Log +P.
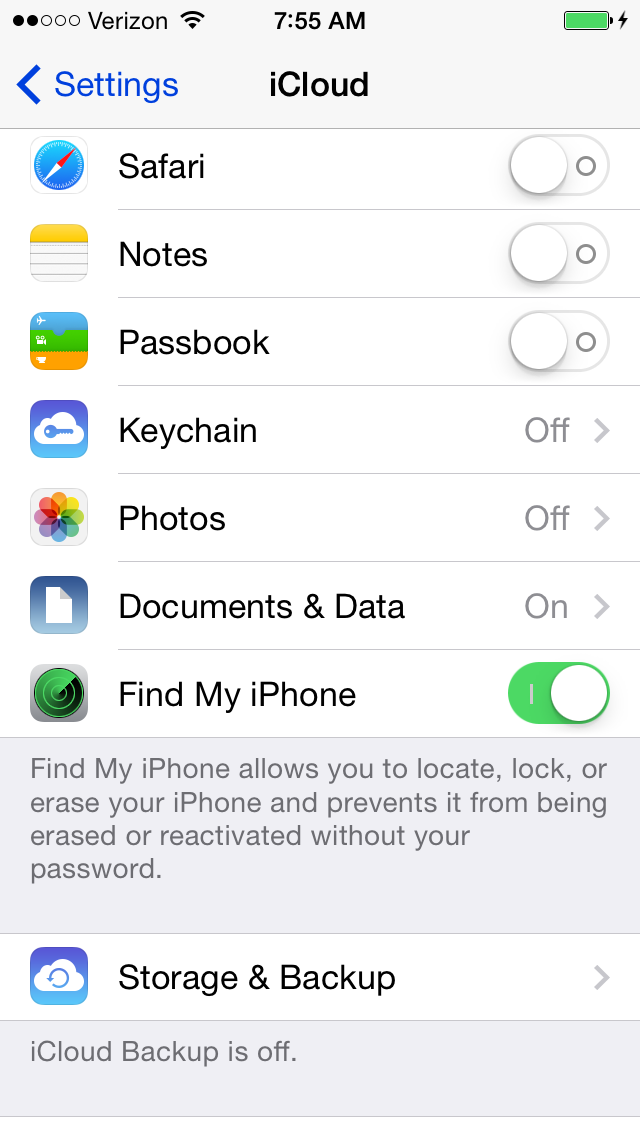 |
| iCloud Settings |
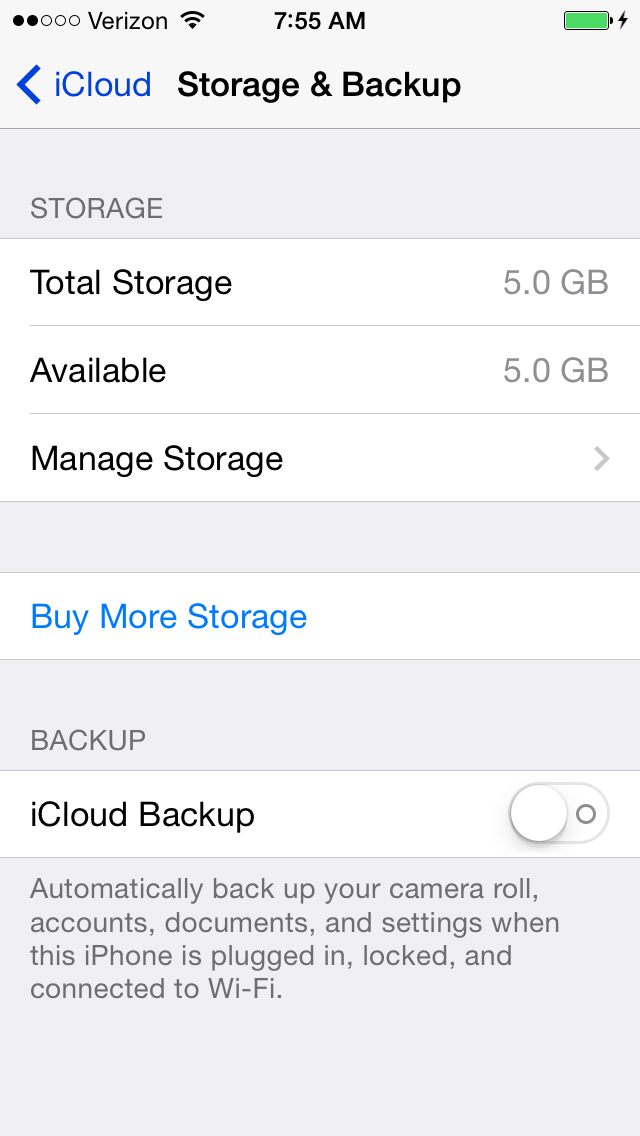 |
| Storage & Backup |
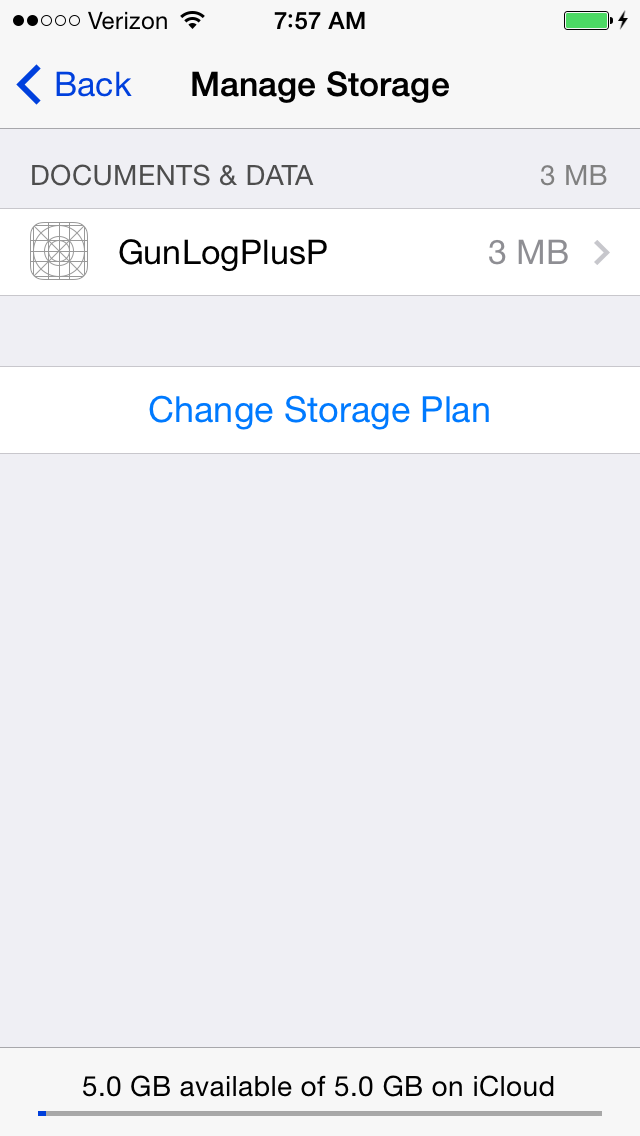 |
| Manage Storage |
Select GunLogPlusP (or it might be listed "Gun Log +P").
Tap "Edit" at the top right.

Tap "Delete All".
If the process didn't work there isn't any reason to try the process again unless you think you missed a step. Some of the databases will not migrate into the new app.
Addendum Three Transferring Data without Using iCloud
If you have a backup of the "Shooting_Buddy.sqlite" file from the previous version of Gun Log +P (or any of the Gun Log apps) you can just copy it to the new Gun Log +P v7.1.1 via iTunes.First you need to have a copy of the database file named "Shooting_Buddy.sqlite".
The steps for getting a copy of the database file is the same for Gun Log, Gun Log SPC, and the old version of Gun Log +P. Here are some screen shots of how to do it. These steps are for Gun Log +P, but are the same for the different Gun Log apps. Just select the proper app.
Step one. Connect iOS device to computer using the USB cable and open iTunes.
Step two. Select you iOS device in the left panel of iTunes. (The left panel is called the Sidebar. If you do not see the Sidebar go to the View menu and "Show Sidebar". If you are running the latest iTunes you will see a small icon that represents your device near the top left of iTunes, see picture of new iTunes further below.)
Step three. Select "Apps". "Apps" is near the top middle.
Step four. Select "Gun Log +P" (or Gun Log SPC or Gun Log). It is listed under "File Sharing" and below "File Sharing" is "Apps".
Step five. Select "Shooting_Buddy.sqlite".
Step six. Drag the sqlite file to your computer desktop or some similar location.
 |
| Old iTunes |
Here is a screen shot of the new iTunes. You have to select your device to see the apps. It is a tiny icon up at the top left, under the play controls, the seventh icon.
|
| New iTunes |
If there is not a "Shooting_Buddy.sqlite" file but there is a "Shooting_Buddy_iCloud.sqlite" or a "Shooting_Buddy_Rcovered.sqlite" then you can try either of these. Copy one of the files to your computer desktop and rename it to "Shooting_Buddy.sqlite" and follow the steps below.
If you have a copy of "Shooting_Buddy.sqlite" then follow the steps listed below.
On Every Device that will run Gun Log +P
- Make sure you have a good Wi-Fi connection.
- Install Gun Log +P but do not run it yet.
- Make sure "Documents & Data" is turned off for Gun Log +P by going into the App Settings app and go into the iCloud settings.
 |
| Gun Log +P Documents & Data Turned OFF |
On Every Device that will Run Gun Log +P with Documents & Data Turned OFF
Do the following steps on all of the devices that will run Gun Log +P.- Connect your iOS device to computer using the USB cable and open iTunes.
- Select your iOS device in the left panel of iTunes. (The left panel is called the Sidebar. If you do not see the Sidebar go to the View menu and "Show Sidebar".)
- Select "Apps". "Apps" is near the top middle.
- Select "Gun Log +P" listed under "File Sharing".
- Drag your copy of "Shooting_Buddy.sqlite" into the panel "Gun Log +P Documents".
|
| iTunes Selecting Gun Log +P App |
|
| After Dragging Shooting_Buddy.sqlite file to iTunes |
Now start Gun Log +P and the data should be transferred. Do these steps on every device that you run Gun Log +P. You will have to do this manual sync process every time you change a record on one device. If you change records on two devices and copy the database from one device to another you will lose the changes on the device to which you are copying. Remember it is just a file copy and not a merge.
Addendum Four
If GL+P version 5.9 has not already lost some or all of your data and the app doesn't always start up and have "Save Error" pop up on your screen it will eventually. If you are a programmer or technically savvy you can read about some of the issues here:
"One of the worst problems with testing iCloud on iOS 5 and 6 was when heavily used accounts would encounter ‘churn’ and become unusable. Syncing would completely stop, and even removing all ubiquitous data wouldn’t make it work. At Lickability, we affectionately dubbed this state “f***ing the bucket.”
http://www.objc.io/issue-10/icloud-core-data.html
"I’ve rewritten my iCloud code several times now in the hopes of finding a working solution," wrote developer Michael Göbel in a blog post, and "Apple clearly hasn’t." The problem is this: Apple has failed to improve the way it syncs databases ("Core Data") with iCloud, yet has continued to advertise and market iCloud as a hassle-free solution."
http://www.theverge.com/.../why-doesnt-icloud-just-work
But GL+P users shouldn't have to worry about this drastic change in technology. Back in February 2012 all GL+P users were provided with instructions on how to backup the data to a computer. http://gunlogplusp.blogspot.com/2012/02/backing-up-your-data-for-gun-log-p.html
I have successfully taken my GL+P backup and reloaded it into v7.1.1. It is a good thing that we anticipated the need to add iTunes File Sharing to GL+P from the onset so that your data could be protected in case of some accident or change like the one we have now. Your diligence in following the instructions on proper use of GL+P by making backups is about to pay off. There is always a chance that a backup could be unusable but there have already been several users transfer their 5.9 data into 7.1.1 without any issues.
If you have not followed directions and backed up your data then do so before upgrading. If you did not read the warning on the app store and have already upgraded and you do not see your data you may still be able to rescue your data, but there has already been one user that could not and all of his important data and information was lost to Apple's CoreData changes.
If you are thinking, "I didn't know about any directions, why didn't you contact me?" you may have been working under a false idea of how Apple's App Store works. Apple does not, has never, and will probably never share any customer information with a developer. Apple provides each app on the App Store with a link to the developer's support site, which we have used from the beginning. Apple only provides that connection for the customer to the developer and provides no connection from the developer to the customer. If you have ever emailed you already know that I respond quickly and if there is something about to change I will email you. There is also a Facebook page where information is always posted.
GL+P 7.1.1 does not automatically import the previous version’s data, but it does not delete it or remove it either. So, unless you have deleted the app from your device the GL+P 5.9 data may still be on your device. You can see it via iTunes. You should see files named “Shooting_Buddy.sqlite” or “Shooting_Buddy_iCloud.sqlite” or “Shooting_Buddy_recovered.sqlite”. Follow the backup directions from February 2012 and see if your data is still available.
Because Apple has finally released a working, although non-backwards compatible, iCloud framework GL+P users for iOS 7 can finally have the many upgrades and new features that Gun Log and Gun Log SPC users have enjoyed for the past fourteen months. Such features include PDF reports where you can print a firearm report for insurance or personal records that includes four photographs and all of the information you entered into the firearm's details. The other PDF report, my personal favorite, is the Firing Set PDF report which contains the photo of the target, a smaller photo of the firearm, and all the details entered into the firing set. You can email or print these PDF reports directly from GL+P. I think you will really like this new functionality.
GL+P 7.1.1 only runs on iOS 7 because of the bugs already mentioned in iCloud for iOS 6.
If for some reason GL+P 7.1.1 does not successfully import your database please email me your database and I will do my best to figure out what is causing the trouble and repair the database and return it to you.
This comment has been removed by the author.
ReplyDeleteHi, just wanted to tell you, I enjoyed this blog post. It was funny. Keep on posting! Such a lovely blog you have shared here with us. Really nice.
ReplyDelete223 Brass Bulk
Hi there! Nice stuff, do keep me posted when you post again something like this!
ReplyDelete7.62x39 ammo for sale