(Please write a review and rate Gun Log +P on the App Store.)
(If you have having issues contact me through the support email. iTunes
App Store does not give me any customer information and I can not use
the ranking area as a blog.)
Gun Log +P (GL+P) stores many details of ammunition.
You can use an ammunition entry in two different ways. The ways are "bulk" and "batch" so to speak.
I typically buy range ammo in bulk. I do not want to make an entry for every box of 9mm FMJ that I have. I will make one entry and then add to the round count. Yes, I have to do math in my head to do this.
For target, hunting, or hand loaded ammunition I want to track it by each batch or box.
To navigate to the "Ammo" list just tap the "Ammo" button in the bottom tab bar.
To create a new entry just tap the "+" button located in the top button bar on the right.
Notice that some fields have buttons to their left. These buttons bring up "Pickers" so that you don't have to type in the details. If the picker doesn't have the information you need you can always tap the field and enter the data.
Tap the "Make" button. In the picker you can flip the view to scroll around. If the ammunition make is listed you can double tap the entry or tap the entry and then tap the "Done" button. Otherwise you can tap the "Cancel" button.
Notice that the value from the picker has been placed in the field. You can still edit the field if you like.
Now tap the "Caliber" button.
The "Caliber" picker looks like this. The calibers are grouped so scroll around and get familiar with the layout.
After you select a caliber you can tap the "Type" button to select the bullet type. Here is the bullet type picker.
So far we have entered make, caliber, and type without having to do any typing.
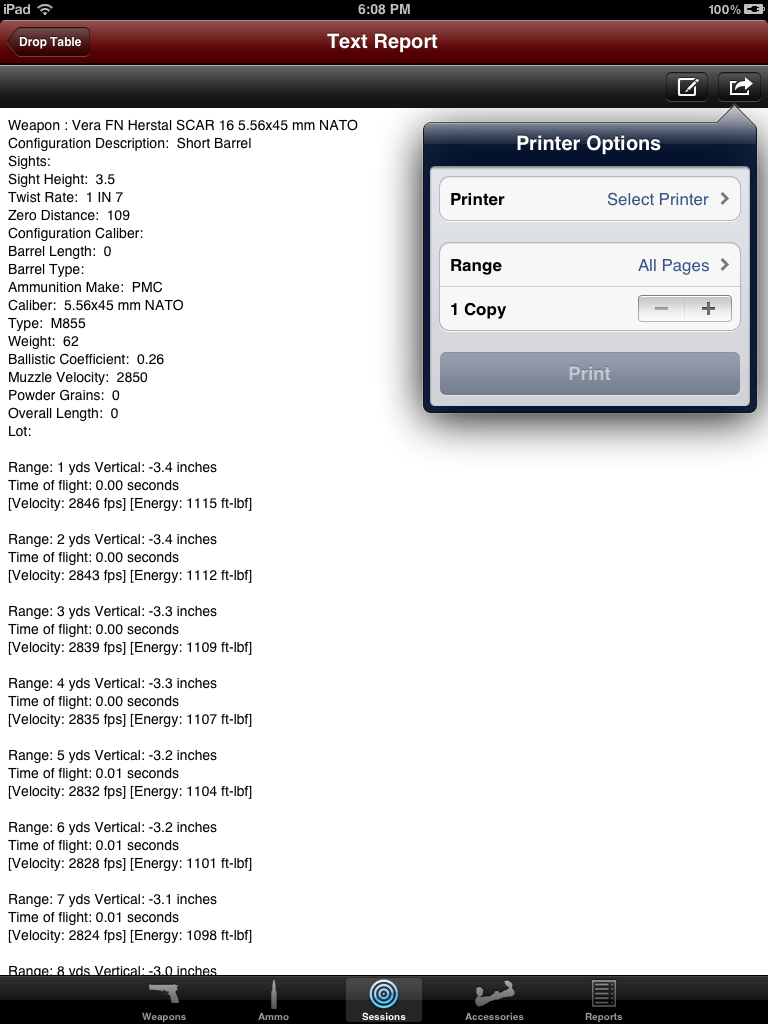
If you want to use the "Ballistic Drop Table" to estimate the external ballistics then you need to enter values for "Ballistic Coefficient" and "Muzzle Velocity". Typically this data is found on the ammunition's box or manufacturers web site.
When you have finished just tap the "Ammo" button at the top left to navigate back to the main ammo list, or double tap the "Ammo" button in the bottom tab bar.
This concludes the tutorial.
Sunday, February 5, 2012
Entering a Firing Session and Firing Sets into Gun Log +P
(If you have having issues contact me through the support email. iTunes
App Store does not give me any customer information and I can not use
the ranking area as a blog.)
Tracking range results is a core feature of Gun Log +P (GL+P). It is the primary function and the reason I developed the original Gun Log application.
A "Firing Session" is like a day at the range.
A "Firing Set" is typically what you fired at a target or in a firing scenario.
I usually have one "Firing Session" in a day. I go to one range typically. But while at the range I will shoot a couple of different firearms and shot at targets at different distances and shoot in different manners such as slow fire or rapid fire.
This tutorial is very long and I will omit details on how pickers work and button locations. Since you have already entered a weapon and ammunition details you are familiar with the look and feel of GL+P.
Start by tapping the "Sessions" button in the tab bar.
Tap the "+" button for a new firing session.
Tap an entry and select it. Double tap or tap the "Done" button.
Tracking range results is a core feature of Gun Log +P (GL+P). It is the primary function and the reason I developed the original Gun Log application.
A "Firing Session" is like a day at the range.
A "Firing Set" is typically what you fired at a target or in a firing scenario.
I usually have one "Firing Session" in a day. I go to one range typically. But while at the range I will shoot a couple of different firearms and shot at targets at different distances and shoot in different manners such as slow fire or rapid fire.
This tutorial is very long and I will omit details on how pickers work and button locations. Since you have already entered a weapon and ammunition details you are familiar with the look and feel of GL+P.
Start by tapping the "Sessions" button in the tab bar.
Tap the "+" button for a new firing session.
Enter a location or event name.
Tap "Go to Firing Sets". This is were you make entries for each time you fire a weapon. It might be a three round group set, it might be an entire magazine fired set, or any other set you do.
Just tap the "+" button to add a new entry.
The firing set stores a lot of information. The most common entries are at the top.
Tap the "Weapon" button and the "Weapon picker" is shown.
Note that summary information has been entered in the field next to the button. Note that if you tap the field directly it will now take you to that weapon's details.
Tap the "Config" button.
Choose the configuration you are using. This is important for reporting and bullet drop estimation.
When you tap the "Ammo" button you get an ammo picker.
No enter values for rounds fired, group size, and other information.
Firing method and firing stance has pickers so you can pick commonly used values. You can always type in your own custom data.
Here is the firing method picker.
Now tap the "Firing Stance" button.
Pick your stance.
You can associate a photograph with a firing set. Typically I photograph targets. The proof is in the picture. Tap the camera button.
Take a new picture or choose on from the camera roll or album.
Here I choose from the album.
GL+P makes a copy of the image. It is a low resolution image so that it doesn't use a lot of memory. The trash button removes the low resolution image not the original.
If you have any type of issues during a firing set you can record it. Just tap the "Failures" button.
Tap the "+" button to make a new entry.
The new entry appears in the list, just tap it to go to its details.
You can use the "Failure" picker or enter data by hand.
Now to be fair, my FN SCAR 16 hasn't had any failures so I will remove the entry. Tap the "Edit" button.
Tap the "-" button.
Tap the "Delete" button.
The entry is gone. Most of the lists are edited in that manner.
Back in the details tap the "Drop Table" button.
The "Drop Table" is an external ballistics calculator that uses the G1 ballistic coefficient to calculate the flight path of a bullet.
Just tap the"Calculate" button.
You might want to export this data so you can copy out specific distances and print that out and keep it with your firearm. Just tap the "Report" button at the top right and it takes you to the following "Text Report".
You can email the data by tapping the "Compose" button.
Or if you tap the "Action" button it will bring up print options.
Back in the firing set enter the distance to the target and that covers the most common information stored in a firing set.
Navigating back from the firing set details to the firing sets list you see your new entry.
Navigate back to the Firing Session and you see the entry for the session.
This concludes a brief introduction to firing sessions and firing sets.
Backing up your data for Gun Log +P, Gun Log SPC, and Gun Log
(If you have having issues contact me through the support email. iTunes
App Store does not give me any customer information and I can not use
the ranking area as a blog.)
If you are using iCloud to keep the data in sync with multiple devices realize that you should backup your data but should not restore the backup unless iCloud data has been deleted or lost.
Do not take a Gun Log +P backup and try to save/restore it to Gun Log or Gun Log SPC, the iCloud data from Gun Log +P will cause a "save error" message to be displayed unless you are running 5.9 or higher.
These steps are the same for all of the Gun Log Apps.
You need a desktop computer and iTunes.
Step one. Connect iOS device to computer using the USB cable and open iTunes.
Step two. Select you iOS device in the left panel of iTunes. (The left panel is called the Sidebar. If you do not see the Sidebar go to the View menu and "Show Sidebar".)
Step three. Select "Apps". "Apps" is near the top middle.
Step four. Select "Gun Log +P". It is listed under "File Sharing" and below "File Sharing" is "Apps".
Step five. Select "Shooting_Buddy.sqlite" or "Shooting_Buddy_iCloud.sqlite".
Step six. Drag the sqlite file to your desktop or some similar location.
If you are using Gun Log SPC or Gun Log you can take the back up and transfer it to another device. Just hook up the device to your computer and in iTunes File Sharing just drag "Shooting_Buddy.sqlite" to the app's documents. It's just that simple.
Friday, February 3, 2012
Gun Log +P is nearing final submission to Apple
iCloud coding isn't trivial and I have spent many hours re-writing how data is updated in Gun Log +P so that it isn't to "chatty" with Core Data and iCloud services.
I personally prefer to use iTunes and backup my database and copy it to other devices because there is no chance of being out of synch. Any synch technology can get into a state where the data is not the same on every device or instance. That is the nature of the beast.
Here are some screen shots showing the final colors and layouts for a few areas in Gun Log +P.
Subscribe to:
Posts (Atom)