Sunday, February 5, 2012

An Introduction to Gun Log +P


Gun Log +P and iCloud Sync Issues.

UPDATE: (November 12, 2012)
I have been working with Apple Development Support. For the past couple of weeks we have been sharing code and going through the use cases for Gun Log +P. I have taken all of the advice and created Gun Log +P 5.8 and submitted it to the App Store. I have also tested these new concept on iOS 6.1 BETA as well. I hope this finally puts the iCloud sync problems to rest. The problem is that a database that has been synced with iCloud can not be used if iCloud is turned off (if you have turned off "Documents and Data"). Now Gun Log +P will have the ability to be used off line. Any changes off line are not synced. Gun Log +P is meant to be used with iCloud turned on. In GL+P 5.8 there will not be any recommendations on how to backup the iCloud database. You will rely on Apple to keep the data in the cloud and bring down that data if you delete and reinstall GL+P.

Introduction


(If you have having issues contact me through the support email. iTunes App Store does not give me any customer information and I can not use the ranking area as a blog.)

Gun Log +P extends the reporting and synching abilities of Gun Log and the synching abilities of Gun Log SPC.

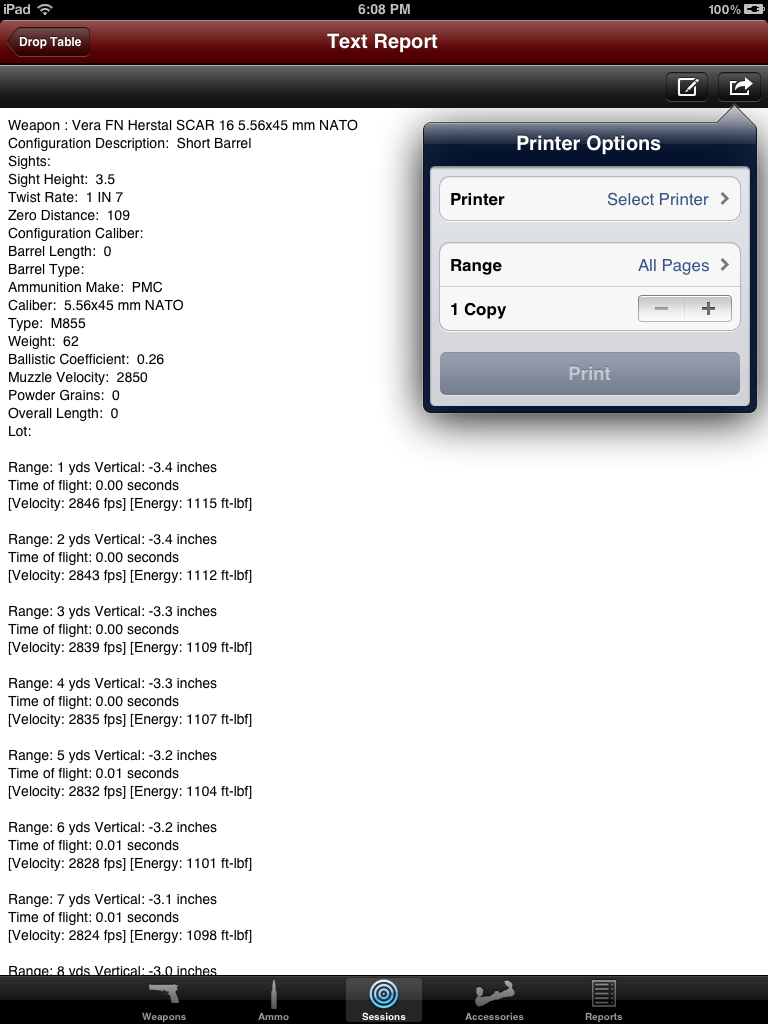
Gun Log +P does export data through printing, emails, and simple copy/paste to other applications.

Gun Log +P does use iCloud functionality to backup data and sync data between multiple iOS devices. You can transfer existing Gun Log data to Gun Log +P but it will not sync with iCloud. If you want to use iCloud the data must be entered into Gun Log +P with an iCloud account configured and "Documents and Data" turned on in the iOS settings for iCloud in the Settings App. You do not have to use iCloud to use Gun Log +P.

Gun Log +P will be enhanced with new releases that take advantage of location services, web provided information and services, sharing and collaboration, and any technology that would be useful or helpful.

Gun Log +P has all of the functionality of Gun Log plus the ability to export detailed text reports from most every view. Gun Log SPC is Gun Log +P without iCloud synch.

Do not take a Gun Log +P backup and try to save/restore it to Gun Log or Gun Log SPC, the iCloud data from Gun Log +P will cause a "save error" message to be displayed.

For more details see: Gun Log versus Gun Log SPC versus Gun Log +P

What this Tutorial Covers

This tutorial will cover the basics needed for you to get out to the range and use Gun Log +P in conjunction with your shooting routine.

You should not try to learn how to use Gun Log +P at the range. At the range your focus should be upon safety. You should create a few entries in Gun Log +P at home where your mind can be on learning the Gun Log +P app and not worrying about muzzle safety. I recommend you follow each segment below and enter the data. You can always delete the entries when you are finished.

Before you go to the range you should enter the weapons you will be firing and enter the ammunition you will be using.

Entering a Weapon

Go to this tutorial for the specific details for entering a weapon.

Entering Ammunition

Go to this tutorial for the specific details for entering ammunition.

Entering a Firing Session and Firing Set

Go to this tutorial for the specific details for entering a firing session and related firing sets.

Pass Code

Go to the settings of your iOS device. There will be a list of your applications. Find Gun Log +P.


Features and Feature Requests

There has been much effort given to describing what Gun Log +P does on the App Store and in this blog. It is not feasible to list everything that the app does and does not do and there is no agenda to hide any aspect of the app.

Please email any feature requests or enhancements that you may have. If the feature fits with the existing architecture it stands a better chance of being added.

Using the App Store review process to request features does not allow for the gathering of details and requirements. Apple does not share any information of the purchaser and therefore there is no way to contact a reviewer for details or further information. Please email your requests.

Ratings and Reviews

Please write a review for Gun Log +P. Apple does not give me any customer information so if you want to make a feature request please email the request instead of putting it in the review. If the feature request is in the review I can not contact you to ask for clarification.

Conclusion


Thank you for using Gun Log +P. I hope these tutorials and blog posts are useful.

Entering Weapon Data into Gun Log +P

Entering a Weapon
 (Please write a review and rate Gun Log +P on the App Store.)

(If you have having issues contact me through the support email. iTunes App Store does not give me any customer information and I can not use the ranking area as a blog.) 


(Note: These are directions for Gun Log +P version 5.3 which has not yet been release by Apple. Hopefully this will be available before August!)

When you first launch Gun Log +P (GL+P) the first screen of information is the Weapons view.
If you look at the bottom of the screen you will see the "Tab Bar". The item selected is "Weapons".


 To create a new weapon entry just tap the "+" button at the top right. The buttons at the top are in a button bar. Typically most interaction with a view will be at the top in a button bar.

When you tap the "+" button GL+P goes directly to a new weapon's detail view.


In the Weapon Details view you can enter data and navigate to lists for configurations and maintenance, a photo, ballistic drop table, or a report. Notice each button in the button bar that is used to access stated functionality.

First thing to do is enter a make. Tap the "Make" button. A "Make Picker" will appear. If your weapon make is not listed you can cancel the picker and tap directly into the "Make" field to the right of the button and enter the make or you can enter a "Custom" value by clicking the "compose" button at the top right.


Just type in the custom value and top the blue "+" button on the right.


Tap the done button at the bottom right to go back to the picker list.


In this example I want to use an existing maker so tap the "All" button to show all of the makers.


Double tap the maker or tap the "done" button.


Select the make from the picker and tap "Done" or double tap the entry. Next enter the model if you want to record model information. Model data has to be entered via the keyboard, there is no picker for models.


There is a picker for calibers and it has most calibers listed. The entries are grouped, so flip the picker and scroll around to see the layout. You may enter a custom value as well by tapping the compose button at the top right.


As with most pickers, double tap the entry you want or single tap to select the entry and then tap the "Done" button.


Tapping the "Action/Type" button brings up a picker. It works just like the other pickers.


You can give a weapon a nick name. It is not unusual for firearm owners to have more than one firearm of the same model.


You can dismiss the keyboard by tapping the button on the lower right of the keyboard. Now tap the "Configurations" button at the top left of the button bar.


A weapon may have several configurations. For pistols it is not unusual to see a .357 SIG and .40 S&W barrel for the same weapon. For rifles you may have different optic configurations or you may take note of optic settings for different zero ranges. Weapon Configurations is a very handy feature.

Notice that there is a default configuration saved for you. You can use that entry, delete that entry, or add another configuration entry. To initiate a delete action for an entry tap the "Edit" button at the left of the button bar or swipe right to left across the entry.

To add a new Weapon Configuration just tap the "+" button at the top right of the button bar.


To navigate to the new entry entitled "Blank Name" just tap the row entry or the blue arrow button.


You should give the entry a description. Just tap in the "Description" field.


If you want to use the Ballistics Drop estimator, an external ballistics calculator, you need to enter the values for "Sight Height" and "Zero Distance".


Tap the "Configurations" button at the left of the top button bar to go back to the list of configurations.


Continue to go back by tapping the "Weapon" button.


For each weapon you can track maintenance. Obviously maintenance is essential for firearms and a note with details about maintenance can be useful. Just tap the "Maintenance" button in the top button bar to navigate to the "Maintenance History" list.


There is an entry already created for you called "New Weapon...". You can use that entry, delete it, or make another. To initiate a delete action for an entry tap the "Edit" button at the left of the button bar or swipe right to left across the entry.

Tap the "+" button to add a new entry.


To navigate to the "Maintenance" details just tap the entry or the blue arrow button.


There are controls to quickly mark the most common maintenance items. The "Notes" field is where you specify information that is not represented in the "No | Yes" buttons.

Tap the "Maintenance..." button at the top right to go back to the maintenance history list.


Tap "Weapon" to go back to the weapon's detailed view.


You can also add a photograph of your weapon. Tap the camera button in the top button bar.


You can now take a new photo or use an existing photo from the camera roll. The "trash" button disassociates an image, it does not delete it from your camera roll. GL+P makes a low resolution copy of you image and stores it in the database. I keep my original images in case I need a hi-resolution image for other purposes.

Tap the "album" button, the button to the right of the "camera" button.


Navigate to the image you want and tap it.


If you are done entering information for your weapon you can navigate back using the navigation button at the topmost left position or you can double tap "Weapons" in the tab bar at the bottom of the app's view.


That is the end of this introduction to entering a weapon into Gun Log +P.

Entering Ammunition Data into Gun Log +P

(Please write a review and rate Gun Log +P on the App Store.)

(If you have having issues contact me through the support email. iTunes App Store does not give me any customer information and I can not use the ranking area as a blog.) 

Gun Log +P (GL+P) stores many details of ammunition.

You can use an ammunition entry in two different ways. The ways are "bulk" and "batch" so to speak.

I typically buy range ammo in bulk. I do not want to make an entry for every box of 9mm FMJ that I have. I will make one entry and then add to the round count. Yes, I have to do math in my head to do this.

For target, hunting, or hand loaded ammunition I want to track it by each batch or box.

To navigate to the "Ammo" list just tap the "Ammo" button in the bottom tab bar.


To create a new entry just tap the "+" button located in the top button bar on the right.

Notice that some fields have buttons to their left. These buttons bring up "Pickers" so that you don't have to type in the details. If the picker doesn't have the information you need you can always tap the field and enter the data.


Tap the "Make" button. In the picker you can flip the view to scroll around. If the ammunition make is listed you can double tap the entry or tap the entry and then tap the "Done" button. Otherwise you can tap the "Cancel" button.


Notice that the value from the picker has been placed in the field. You can still edit the field if you like.

Now tap the "Caliber" button.


The "Caliber" picker looks like this. The calibers are grouped so scroll around and get familiar with the layout.


After you select a caliber you can tap the "Type" button to select the bullet type. Here is the bullet type picker.


So far we have entered make, caliber, and type without having to do any typing.


If you want to use the "Ballistic Drop Table" to estimate the external ballistics then you need to enter values for "Ballistic Coefficient" and "Muzzle Velocity". Typically this data is found on the ammunition's box or manufacturers web site.


When you have finished just tap the "Ammo" button at the top left to navigate back to the main ammo list, or double tap the "Ammo" button in the bottom tab bar.

This concludes the tutorial.


Entering a Firing Session and Firing Sets into Gun Log +P

(If you have having issues contact me through the support email. iTunes App Store does not give me any customer information and I can not use the ranking area as a blog.) 

Tracking range results is a core feature of Gun Log +P (GL+P). It is the primary function and the reason I developed the original Gun Log application.

A "Firing Session" is like a day at the range.
A "Firing Set" is typically what you fired at a target or in a firing scenario.

I usually have one "Firing Session" in a day. I go to one range typically. But while at the range I will shoot a couple of different firearms and shot at targets at different distances and shoot in different manners such as slow fire or rapid fire.

This tutorial is very long and I will omit details on how pickers work and button locations. Since you have already entered a weapon and ammunition details you are familiar with the look and feel of GL+P.

Start by tapping the "Sessions" button in the tab bar.
Tap the "+" button for a new firing session.


Enter a location or event name.


Tap "Go to Firing Sets". This is were you make entries for each time you fire a weapon. It might be a three round group set, it might be an entire magazine fired set, or any other set you do.
Just tap the "+" button to add a new entry.


The firing set stores a lot of information. The most common entries are at the top.


Tap the "Weapon" button and the "Weapon picker" is shown.


 Tap an entry and select it. Double tap or tap the "Done" button.


Note that summary information has been entered in the field next to the button. Note that if you tap the field directly it will now take you to that weapon's details.
Tap the "Config" button.


Choose the configuration you are using. This is important for reporting and bullet drop estimation.


When you tap the "Ammo" button you get an ammo picker.


 No enter values for rounds fired, group size, and other information.
Firing method and firing stance has pickers so you can pick commonly used values. You can always type in your own custom data.


Here is the firing method picker.


Now tap the "Firing Stance" button.


Pick your stance.


You can associate a photograph with a firing set. Typically I photograph targets. The proof is in the picture. Tap the camera button.


Take a new picture or choose on from the camera roll or album.


Here I choose from the album.


 GL+P makes a copy of the image. It is a low resolution image so that it doesn't use a lot of memory. The trash button removes the low resolution image not the original.


If you have any type of issues during a firing set you can record it. Just tap the "Failures" button.


 Tap the "+" button to make a new entry.


 The new entry appears in the list, just tap it to go to its details.


 You can use the "Failure" picker or enter data by hand.


 Now to be fair, my FN SCAR 16 hasn't had any failures so I will remove the entry. Tap the "Edit" button.


 Tap the "-" button.


 Tap the "Delete" button.


The entry is gone. Most of the lists are edited in that manner.


Back in the details tap the "Drop Table" button.


 The "Drop Table" is an external ballistics calculator that uses the G1 ballistic coefficient to calculate the flight path of a bullet.


 Just tap the"Calculate" button.


 You might want to export this data so you can copy out specific distances and print that out and keep it with your firearm. Just tap the "Report" button at the top right and it takes you to the following "Text Report".


 You can email the data by tapping the "Compose" button.


 Or if you tap the "Action" button it will bring up print options.


Back in the firing set enter the distance to the target and that covers the most common information stored in a firing set.


Navigating back from the firing set details to the firing sets list you see your new entry.


 Navigate back to the Firing Session and you see the entry for the session.


This concludes a brief introduction to firing sessions and firing sets.